Friday, April 29, 2011

Vinyl Cups.


Okay, saw these on a few blogs recently surfing cricut stuff. Totally unrelated, but how cool there's a new Expression out there?! Good gravy, I love my cricut! And think that's cool there's new version, not that I'll be getting it any time soon, but still super cool, right?! I watched some of the videos of it, and love that it will cut out Imagine shapes from their cartridges too.


Back to my cups. I was giddy at the idea of making some. Went searching around on line, and some fellow sites for crafters. Finally saw that Walmart had some back in stock. Found plain ones at Target, but the price point was higher than I wanted to pay. (I'm cheap!) Walmart had some darling ones too. Gabi and I liked the red polka dotted cup. Thought it was perfect for Trey's teacher too, since the school colors are red and black. The next day, Trey had a double header near another Walmart, so I tried there. They had blue polka dots, solid blue, green/yellow polka dots and solid green. The blue dots were darling. That was ideal for Gabi's teacher, based on her love of turtles, and favorite colors are blue and green.
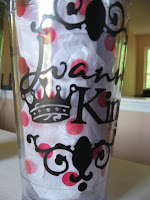


Thoughts of who I could make them for where going thru my head! I mean, how neat to personalize them. Teacher appreciation is coming up, so how perfect as little gifts for the kids teachers. Than I wanted one myself and the kids. Some of you may not know this, but I heart the word DUDE. I say it to everyone at the kids school, and drive Trey nuts with it. The kids at his school call me Ms. Dude. I simply love the word. That meant it was going on my cup!


I designed the vinyl using the gypsy, and several different cartridges. I used Plantin School Book for the teachers' last names. The crown on King is from Gypsy Wandering. Joanne/Angela were designed with Calligraphy Collection. The swirls are from Cindy Lou on Mrs. King's cup. The Baseball cup is designed from Baseball. I can't remember what cartridge my butterfly, and font are from. The welding features are wonderful for making words, and welded each of the names. The baseball was a predesigned sentiment from the baseball cartridge.


Now, don't ya just want to go create some yourself?!

Thursday, April 28, 2011

Take Out Those Images #24.


I'm doing great using images sent to me by sweet stamping friends! This was my last Easter card I made this year that I mailed out to family. I normally am so bad, I make the cards, and don't seem to mail them. This year, I did mail them, but ouch! The shipping on a few of them cost me 1.71. I so need to lay off the buttons! I knew I was mailing this one, so I went easy on my embellies, and tried to add with papers, not bulky flowers or buttons. Debbie sent me some wonderful Easter themed Magnolias this year. Loved them! This sweet little Magnolia was adorable, and a ton of fun to color! I followed a sketch from somewhere, but I'm drawing a blank about what site I had visited.

Thanks for stopping by!

Other supplies: Copices, nesties, stickles, primas, Eleagant Eggplant ink, Cert. Celery cardstock, Cricut Cartridge Serenade for the swirls.

Wednesday, April 27, 2011

Flutter By Wednesday #152, Recipe Challenge

Fun challenge for you all today at Flutter By Wednesday. It's a recipe challenge. You need to use two pattern papers, three flowers, and a button. Don't forget your fairy, angel or butterfly as well. I love how this card turned out. Sweet Tammi, from Tropical Dreams, sent me this image. I had a wonderful time coloring her. Afterwards, I thought it would be a perfect match for my Emma SWIC papers from TAC. I used SU cardstock, Cranberry Crisp, and So Saffron.


This sweetie is colored in copics, and topped off with stickles. I used an EK boarder punch, and nesties. The edges of the pattern papers were distressed and dusted with Cranberry Crisp ink. The flowers are from my stash.


I hope you play along! Make sure you link your card back up at Flutter By Wednesday, so we can pop by and see your artwork! Thanks for stopping by!


Tuesday, April 26, 2011

Take Out Those Images #23.


Life has gotten by me! I've been doing so well on being ahead of blogging stuff, and somehow, spring break comes for the kids, and I'm behind again! Oh, well, I've been working on a big project. I shouldn't beat myself up too much. I'm dying to show it off, but it's not ready just yet, and it's a gift, so I want the recipient to get it and not accidentally peak at it on my blog.


So, today's image features a sweet Elisabeth Bell image. My paper is from Pink Paisley, and the cardstock is from SU. I realized after I had completed the card that I had left off a stripe of pattern paper. It was to go over the pink layer. But being that I had already taped down, layered up, I didn't pull the card apart to fix my boo boo. This will be going to Trey's teacher during teacher appreciation week. Thought the book was perfect for a teacher. I followed the sketch 188 at Mojo Monday.


Thanks for stopping by!

Supplies: Nesties, stickles, copics, primas,

Friday, April 22, 2011

Playing with vinyl.


I read Eat, Pray, Love last year, and fell in love with two sayings in Italian the author talked about in her book. One was the art of doing nothing, and the second was the art of making something from nothing. I had a vision to put the art of doing nothing above my bed, with shadow flowers behind it. I hadn't found a flower in sgv form or on a cricut cartridge that I loved yet, so the vision was stuck on my Sure Cuts A Lot mat. Than I found a set of vinyl art flowers at Target on clearance, for 3.24. Grabbed them, cuz at that price, I'm sure I'd find some place for them. Well, they matched the comforter nicely, I liked them, so that finally took care of that issue.


I was buying some strawberry plants today at Lowes, and went to peak at the molding they sold. Grabbed two 8 foot sections of a molding I liked, and cut it with my miter saw. Leveled it up on my wall, added the flowers, than attached the bottom leg of the frame to hide the edges from the vinyl flowers. Than I added the sentiment I designed. I used Brock Script font and cut it out with Sure Cuts A Lot, and the butterflies are from Lauren M's, Flutters and Flowers svg file. The frame measures 4 feet by 2.5 feet.


Looking at the photo, I need to lower the l, n, and other l in bel. I went cheap and didn't use transfere tape, and put them on like a sticker. It can be removed, so I can adjust the letters still. I think I'm most pleased that I did the whole project myself, from buying the molding, cutting it at the right angles/length, putting it on the wall using a level, and centering it above my bed.

Thursday, April 21, 2011

Sparkling Bell.


I saw the Digi Bells were holding a GD contest, and decided to try out for it. I am always saying how much I love Elisabeth Bell images. You have to love that she's got a site selling digis, on top of stamps being sold at so many locations! I used the second sketch they had for the GD call. You can view the information about the guest designer call on the Digi Bell's site. I used sweet Cupcake for my image. My papers are from TAC, this is Maggie SWIC. My sentiment is from TAC as well. Sweet Cupcake is colored with stickles, and topped with stickles.

Thanks for stopping by.

Other Supplies: Nesties, Martha border punch, Martha's fern punch, Purely Pom. ink, and cardstock, Primas,

Wednesday, April 20, 2011

Flutter By Wednesday #151.


How cute is this image?! Darling little mouse! Anyhow today's challenge at Flutter By Wednesday is an open challenge. Those are always a fan favorite. I used Kioshi Basic Grey paper, and PTI cardstock. I colored her with copics, and cut out the flower to add some depth. And this was an image from my stash!


Hope you play along. Please link your creation back on the Flutter By Wednesday Blog and while you're there, make sure you check out what the other designers made.


Thanks for stopping by!


Other supplies: Nesties, stickles, SU Ink, Prima flowers,